
How to Sign a Word Document Electronically: 4 Effective Techniques Explained - BlueInk
Electronic signatures have emerged as a game changer for both individuals and businesses, offering a convenient way to seal the deal on any document, anywhere, anytime.
And, of course, unlike a common misconception, these documents are secure and legally binding, so you’re all set there. But how do you sign a Word document electronically?
The good news: there are multiple ways to insert a signature in Word. Keep reading to learn more.
How do you sign a Word document electronically? 4 effective techniques
In this blog, we’ll walk you through four simple methods to sign your Word documents to secure your files and make them legally compliant.
Technique 1: Using Microsoft Word's built-in signature line
Microsoft Word has a nifty feature allowing you to add a signature line directly to your document. This isn't just a visual line—it's a dedicated field where you can securely place an electronic signature.
Step-by-step guide on how to add a signature line:
- Open the Word document you need to sign.
- Place your cursor where you want the signature line to appear.
- Access the Insert tab on the ribbon at the top,
- Click on 'Signature Line' in the 'Text' group.

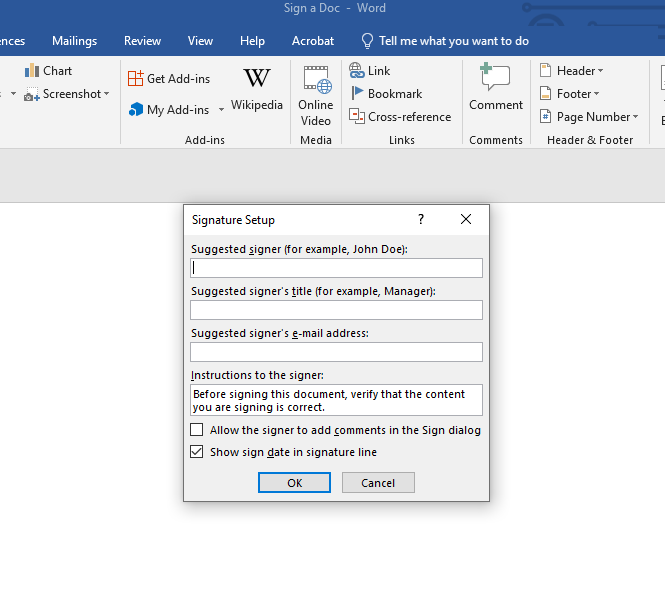
5. Fill in the details: A setup box will pop up, asking for information like the signer’s name, title, and email. Fill these out.

6. Insert the signature line: Click' OK' after entering the details. A signature line, complete with an 'X,' appears in your document.

7. Sign the document by right-clicking the signature line to bring up a menu.
8. Select 'Sign': You'll be prompted to insert a signature. You can type your name, insert an image of your handwritten signature, or use a stylus or your finger on touch-enabled devices.
9. Once you’ve added your signature, save the document to retain the signature.
This method makes adding a professional and legally binding signature to any Word document easy.
Technique 2: Inserting a scanned image of your signature
First, create your signature, which you’ll later turn into an image. Here’s how you can do it.
Choose a pen and paper with black or dark blue ink for better contrast. Sign your name as you usually would. Now, scan to digitize your signature.
If you don't have a scanner, a well-lit photo with your smartphone can work too.
Crop the image around your signature and adjust the brightness or contrast if needed so the signature is clear and stands out.
How to insert a scanned signature in Word
- Open the Word document you need to sign.
- Click where you want your signature to go.
- Go to the 'Insert' tab, click on 'Pictures,' and choose 'This Device' to select your scanned signature.

4. Find and click on the image file of your signature to insert it into the document.
5. If the signature is too big or small, click on the image and drag the corners to resize it.
6. Click and drag the image to position it exactly where you want it on the document.
7. If needed, adjust the 'Wrap Text' settings (right-click on the image) to move the signature freely or align it with the text.
Inserting a scanned image of your handwritten signature will let you maintain the personal touch of a hand-signed document while enjoying the convenience of electronic signing.
Technique 3: Utilizing third-party e-signature software
Third-party tools like BlueInk help you sign a Word document electronically—simplifying the document signing process, while keeping it quick and secure.
Integrating e-signature tools with Word
- Pick a third-party e-signature software like BlueInk.
- Sign up for an account with your chosen tool.
- Open the document you want to sign in Microsoft Word.
- Most e-signature tools offer an add-on or API. Install the API from the software’s website.
- Once installed, open the extension, usually found in the ribbon at the top of the document.
- Follow the prompts to upload your Word document to the e-signature platform.
Benefits of using third-party tools
Why should you use third-party signing apps if you can do so directly from Word or Google Docs? Well, mainly because these tools often provide robust security measures to protect sensitive information.
They ensure your electronic signatures comply with relevant laws and regulations. Plus, you get to keep tabs on who has signed the document and who hasn’t—with updates in real time.
What’s more? Third-party tools simplify the process for documents that require signatures from multiple parties, often offering features like automated reminders.
In a nutshell, these types of software add a layer of professionalism and efficiency to your document signing process, making them a worthy consideration for both personal and business use.
Technique 4: Using digital signature certificates
Digital signature certificates are a more secure version of electronic signatures. They use cryptographic techniques, ensuring the signer's identity and the document's integrity.
Unlike simple electronic signatures, which can be as basic as your name typed into a document, digital certificates link the signature to the signer in a verifiable way. This makes them highly secure and tamper-evident.
Acquiring and using digital signature certificates in Word
You will require a digital signature certificate from a certified authority. This process involves verifying your identity and may have associated costs.
Once obtained, install the certificate on your computer. Then, open your document in Word, go to the 'Insert' tab, select 'Signature Line,' and then 'Add Signature Services'. Follow the prompts to use your digital certificate for signing.
Recapping how to add a signature to Word
Electronic signatures have revolutionized document signing, blending convenience with security. From Microsoft Word's signature line to third-party tools like BlueInk, each technique offers unique benefits, catering to your needs.
Want to take your doc-signing process up a notch? Give BlueInk a try. We have everything from DocuSign (and more) at half the rate.

Weekly Newsletter
Get the latest updates, tips, and exclusive offers. Sign up for our weekly newsletter and stay informed!
Recent post
March 17, 2025
February 5, 2025
Electronic signatures have emerged as a game changer for both individuals and businesses, offering a convenient way to seal the deal on any document, anywhere, anytime.
And, of course, unlike a common misconception, these documents are secure and legally binding, so you’re all set there. But how do you sign a Word document electronically?
The good news: there are multiple ways to insert a signature in Word. Keep reading to learn more.
How do you sign a Word document electronically? 4 effective techniques
In this blog, we’ll walk you through four simple methods to sign your Word documents to secure your files and make them legally compliant.
Technique 1: Using Microsoft Word's built-in signature line
Microsoft Word has a nifty feature allowing you to add a signature line directly to your document. This isn't just a visual line—it's a dedicated field where you can securely place an electronic signature.
Step-by-step guide on how to add a signature line:
- Open the Word document you need to sign.
- Place your cursor where you want the signature line to appear.
- Access the Insert tab on the ribbon at the top,
- Click on 'Signature Line' in the 'Text' group.

5. Fill in the details: A setup box will pop up, asking for information like the signer’s name, title, and email. Fill these out.

6. Insert the signature line: Click' OK' after entering the details. A signature line, complete with an 'X,' appears in your document.

7. Sign the document by right-clicking the signature line to bring up a menu.
8. Select 'Sign': You'll be prompted to insert a signature. You can type your name, insert an image of your handwritten signature, or use a stylus or your finger on touch-enabled devices.
9. Once you’ve added your signature, save the document to retain the signature.
This method makes adding a professional and legally binding signature to any Word document easy.
Technique 2: Inserting a scanned image of your signature
First, create your signature, which you’ll later turn into an image. Here’s how you can do it.
Choose a pen and paper with black or dark blue ink for better contrast. Sign your name as you usually would. Now, scan to digitize your signature.
If you don't have a scanner, a well-lit photo with your smartphone can work too.
Crop the image around your signature and adjust the brightness or contrast if needed so the signature is clear and stands out.
How to insert a scanned signature in Word
- Open the Word document you need to sign.
- Click where you want your signature to go.
- Go to the 'Insert' tab, click on 'Pictures,' and choose 'This Device' to select your scanned signature.

4. Find and click on the image file of your signature to insert it into the document.
5. If the signature is too big or small, click on the image and drag the corners to resize it.
6. Click and drag the image to position it exactly where you want it on the document.
7. If needed, adjust the 'Wrap Text' settings (right-click on the image) to move the signature freely or align it with the text.
Inserting a scanned image of your handwritten signature will let you maintain the personal touch of a hand-signed document while enjoying the convenience of electronic signing.
Technique 3: Utilizing third-party e-signature software
Third-party tools like BlueInk help you sign a Word document electronically—simplifying the document signing process, while keeping it quick and secure.
Integrating e-signature tools with Word
- Pick a third-party e-signature software like BlueInk.
- Sign up for an account with your chosen tool.
- Open the document you want to sign in Microsoft Word.
- Most e-signature tools offer an add-on or API. Install the API from the software’s website.
- Once installed, open the extension, usually found in the ribbon at the top of the document.
- Follow the prompts to upload your Word document to the e-signature platform.
Benefits of using third-party tools
Why should you use third-party signing apps if you can do so directly from Word or Google Docs? Well, mainly because these tools often provide robust security measures to protect sensitive information.
They ensure your electronic signatures comply with relevant laws and regulations. Plus, you get to keep tabs on who has signed the document and who hasn’t—with updates in real time.
What’s more? Third-party tools simplify the process for documents that require signatures from multiple parties, often offering features like automated reminders.
In a nutshell, these types of software add a layer of professionalism and efficiency to your document signing process, making them a worthy consideration for both personal and business use.
Technique 4: Using digital signature certificates
Digital signature certificates are a more secure version of electronic signatures. They use cryptographic techniques, ensuring the signer's identity and the document's integrity.
Unlike simple electronic signatures, which can be as basic as your name typed into a document, digital certificates link the signature to the signer in a verifiable way. This makes them highly secure and tamper-evident.
Acquiring and using digital signature certificates in Word
You will require a digital signature certificate from a certified authority. This process involves verifying your identity and may have associated costs.
Once obtained, install the certificate on your computer. Then, open your document in Word, go to the 'Insert' tab, select 'Signature Line,' and then 'Add Signature Services'. Follow the prompts to use your digital certificate for signing.
Recapping how to add a signature to Word
Electronic signatures have revolutionized document signing, blending convenience with security. From Microsoft Word's signature line to third-party tools like BlueInk, each technique offers unique benefits, catering to your needs.
Want to take your doc-signing process up a notch? Give BlueInk a try. We have everything from DocuSign (and more) at half the rate.
