

How to Create an E-signature Using Blueink: A Step-by-Step Guide
Blueink is one of the most accessible, most affordable, and secure e-signature platforms to help you sign and store documents digitally with ease. In this post, we'll guide you through creating e-signatures and initials using the BlueInk hub.
Whether you're a business owner, manager, or freelancer, you'll find this step-by-step guide valuable for streamlining your document signing process.
Using Blueink, you can create e-signatures as well as initials. We’ll show you how to create both types. Let’s start with e-signatures.
How to create an e-signature using Blueink?
But before we tell you how to create e-signatures, let's briefly discuss what e-signatures are and why they are essential.
E-signatures are electronic representations of your handwritten signature, and they have gained widespread acceptance in the digital world. They are legally valid in most jurisdictions, making them a convenient and secure way to sign documents—so if you’re worried about whether your e-signed documents will be valid or not, don’t.
Login to your BlueInk Dashboard
The first step in creating your BlueInk account. Start your 14-day free trial and set up your account. Your dashboard will look like this.

Now, click on the “Settings” and choose “Signatures.”

Now choose “Add Signature.”
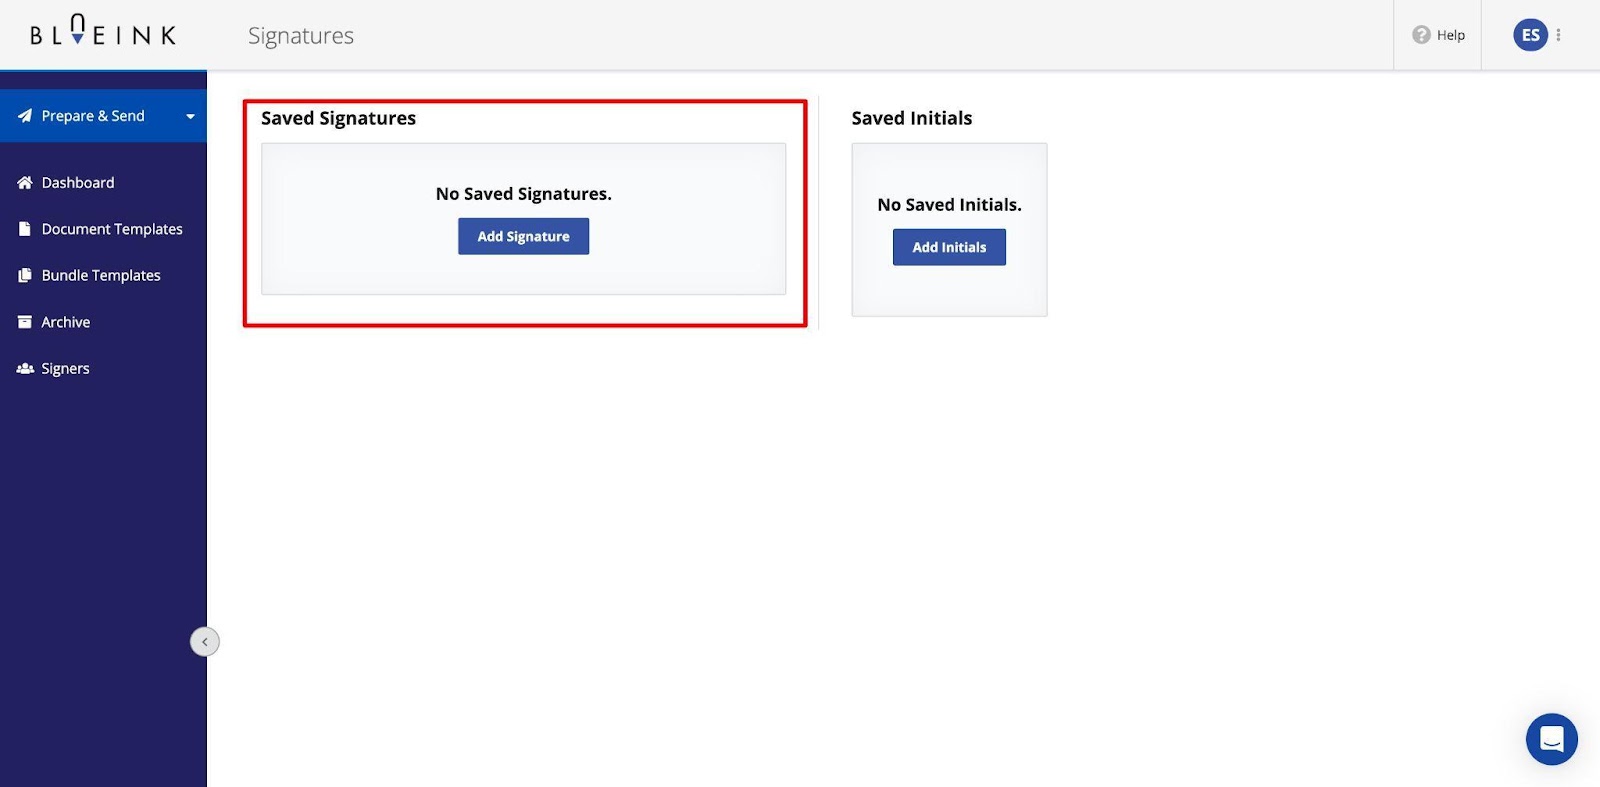
You’ll be asked to type your signature or draw it. Let’s first see how to type an e-signature.
Option 1: Typing your e-signature
Choose “Type” and start writing your signature.
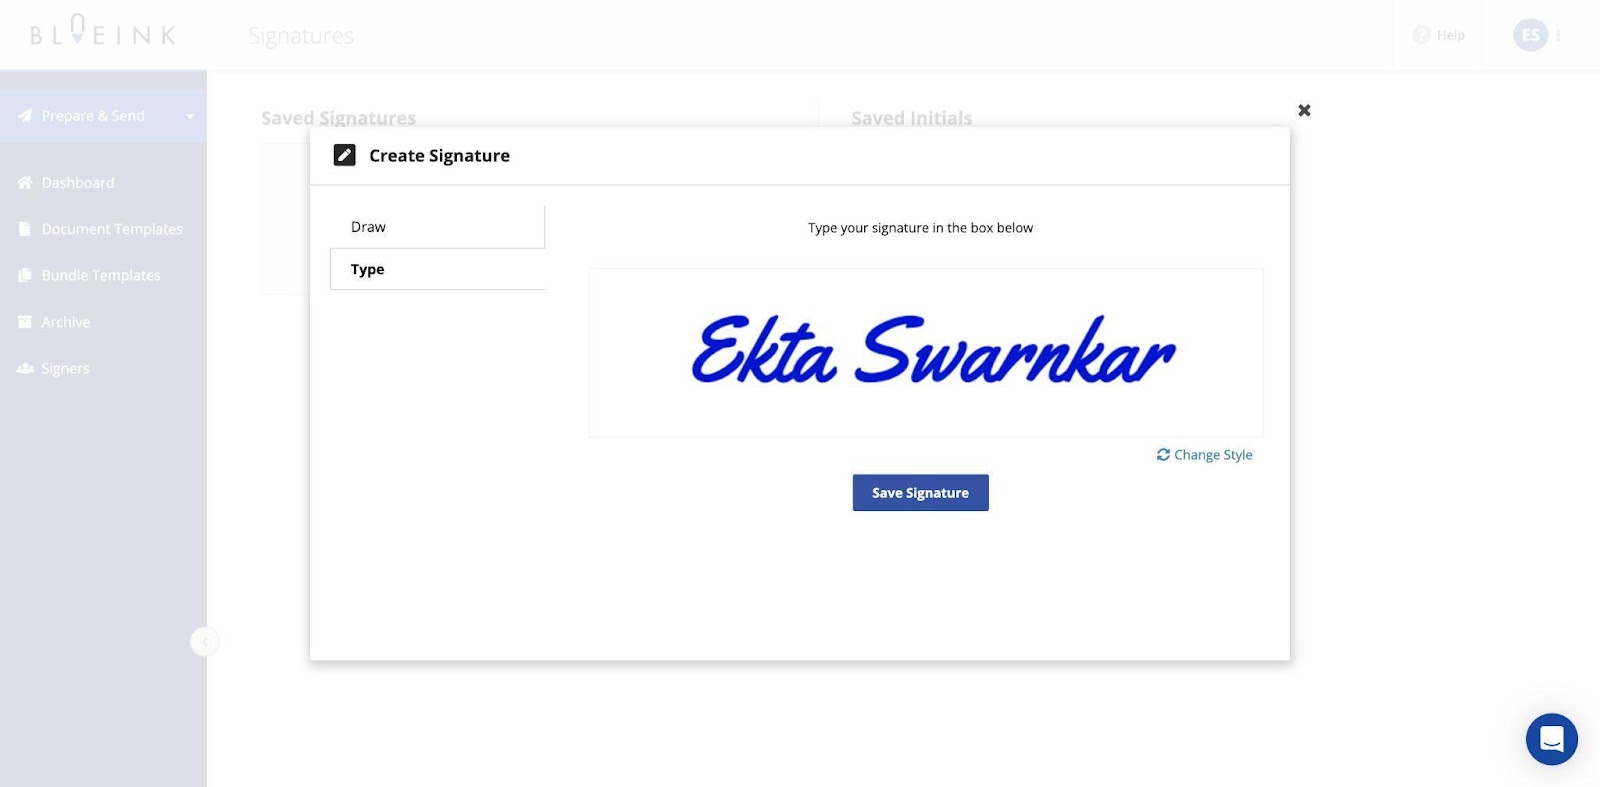
Once done, click on “Save Signature.”
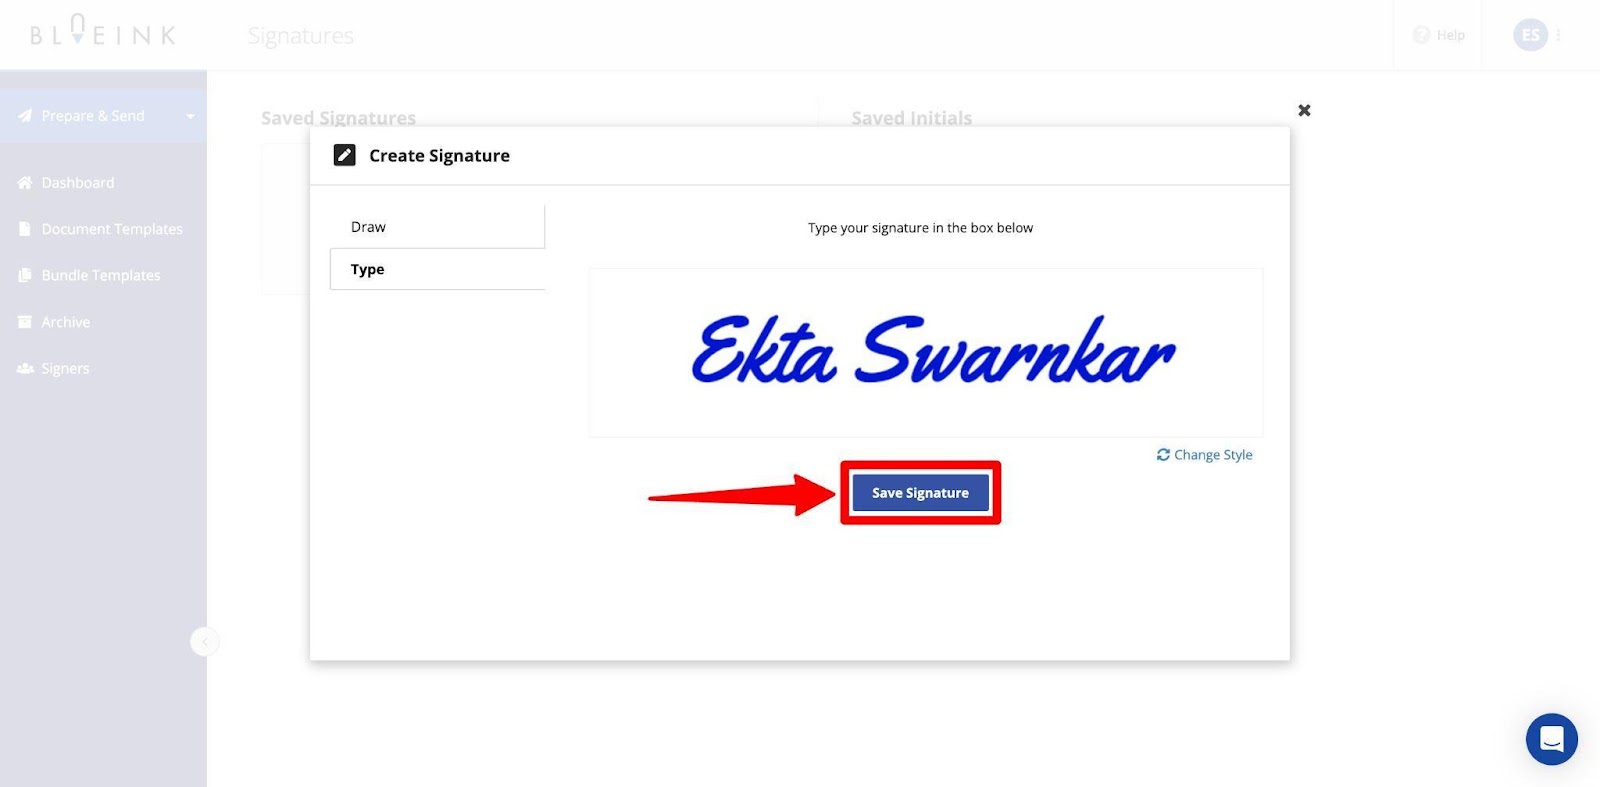
And it’s done. Your signature will appear in “Saved Signatures.”

Now, whenever you sign a new document, your saved signature will automatically populate, and you won’t have to go through the process every time.
Option 2: Drawing your e-signature
If you prefer a more personalized touch for your e-signature, BlueInk allows you to draw it by hand. On the “Signatures” tab, choose “Add Signature” and “Draw.”
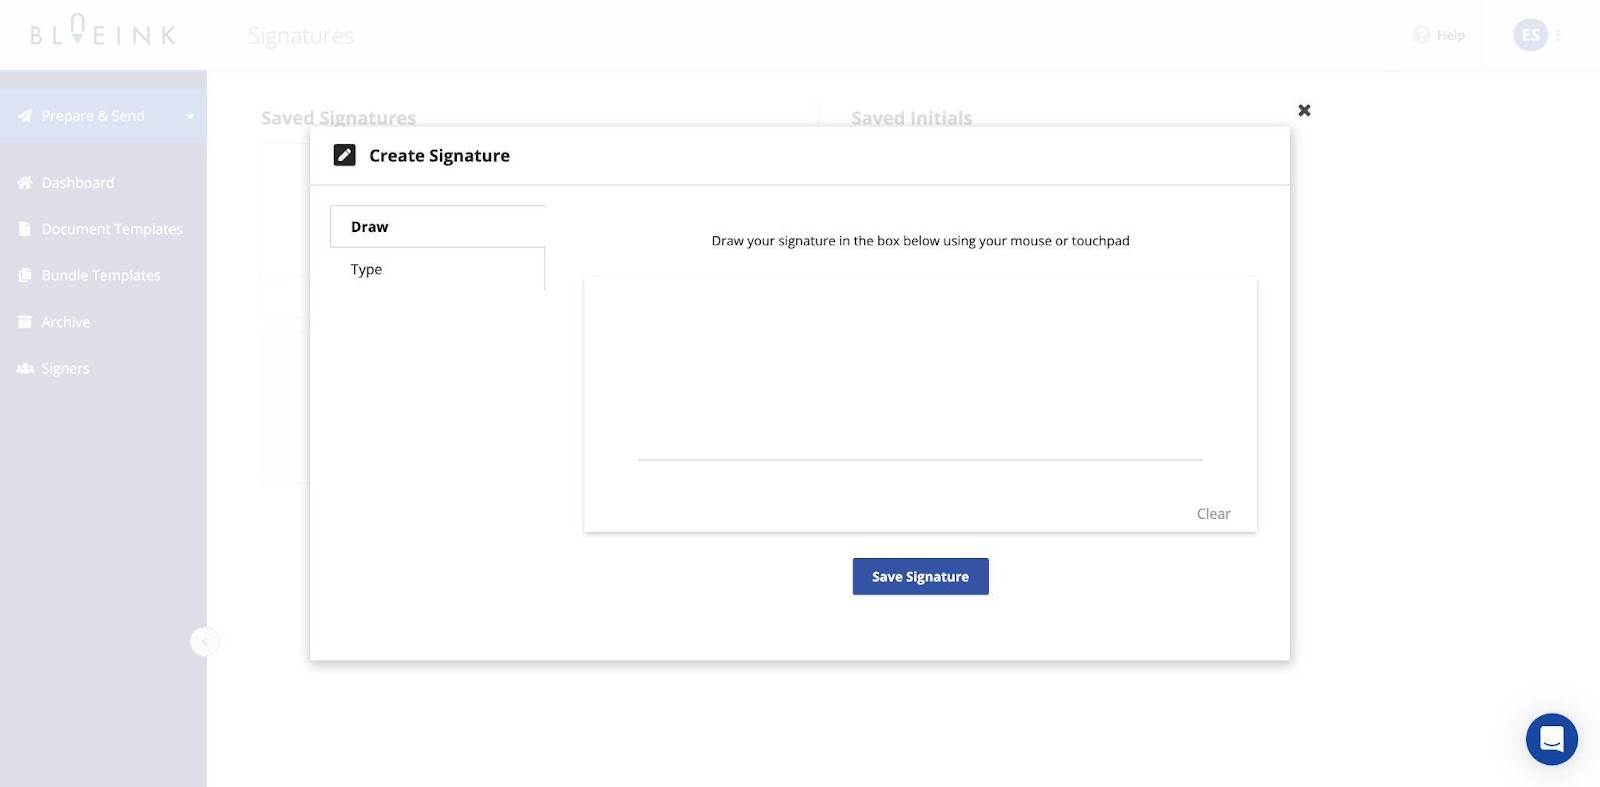
Now, using your touchpad or mobile, draw your signature. You can use the “Clear” option to redraw the sign.
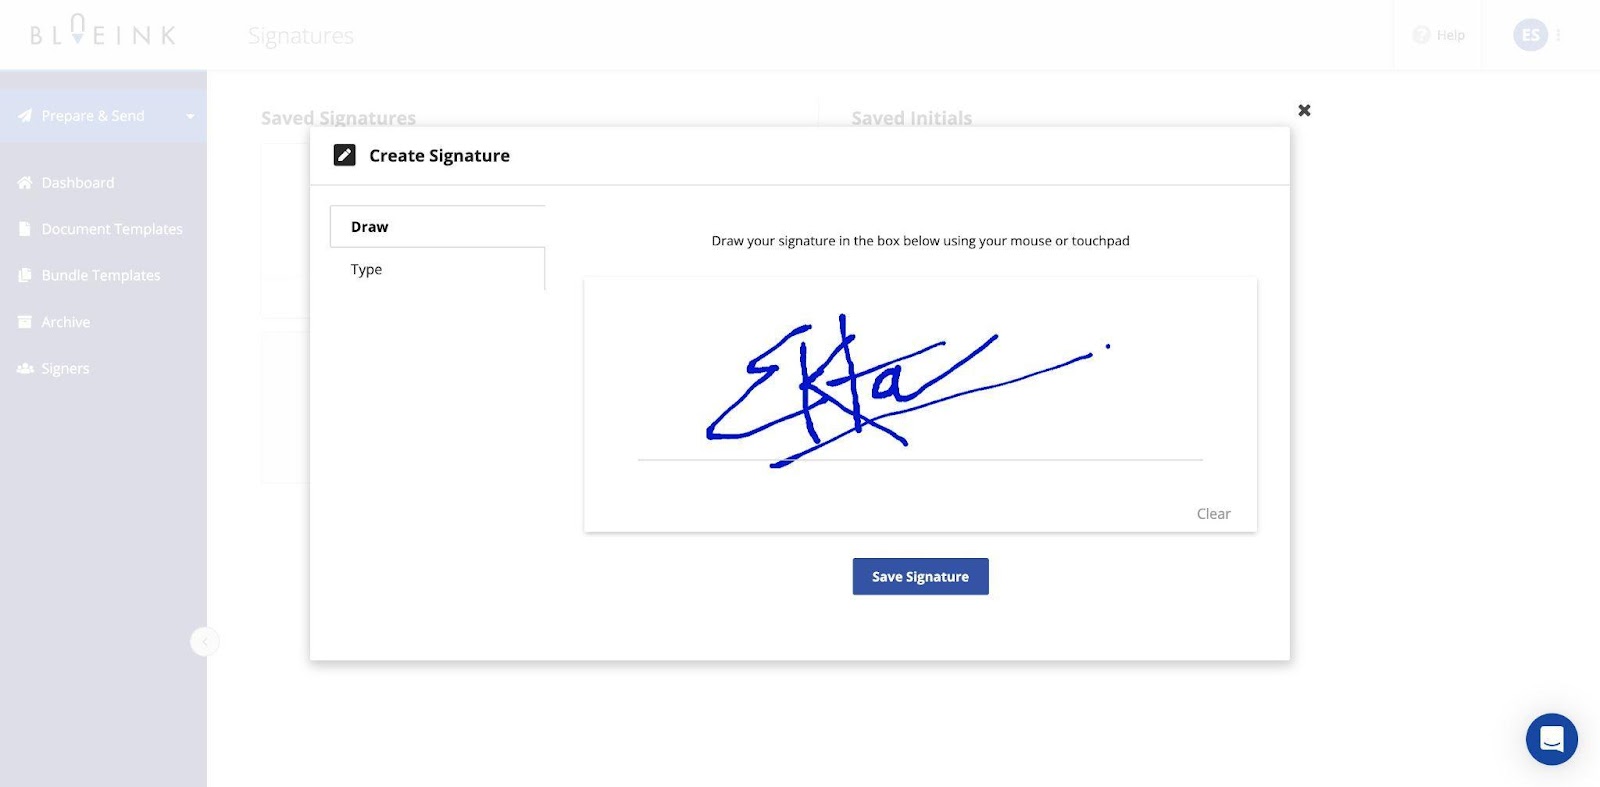
Once satisfied with your signature, click “Save Signature,” it’ll appear as a saved signature.
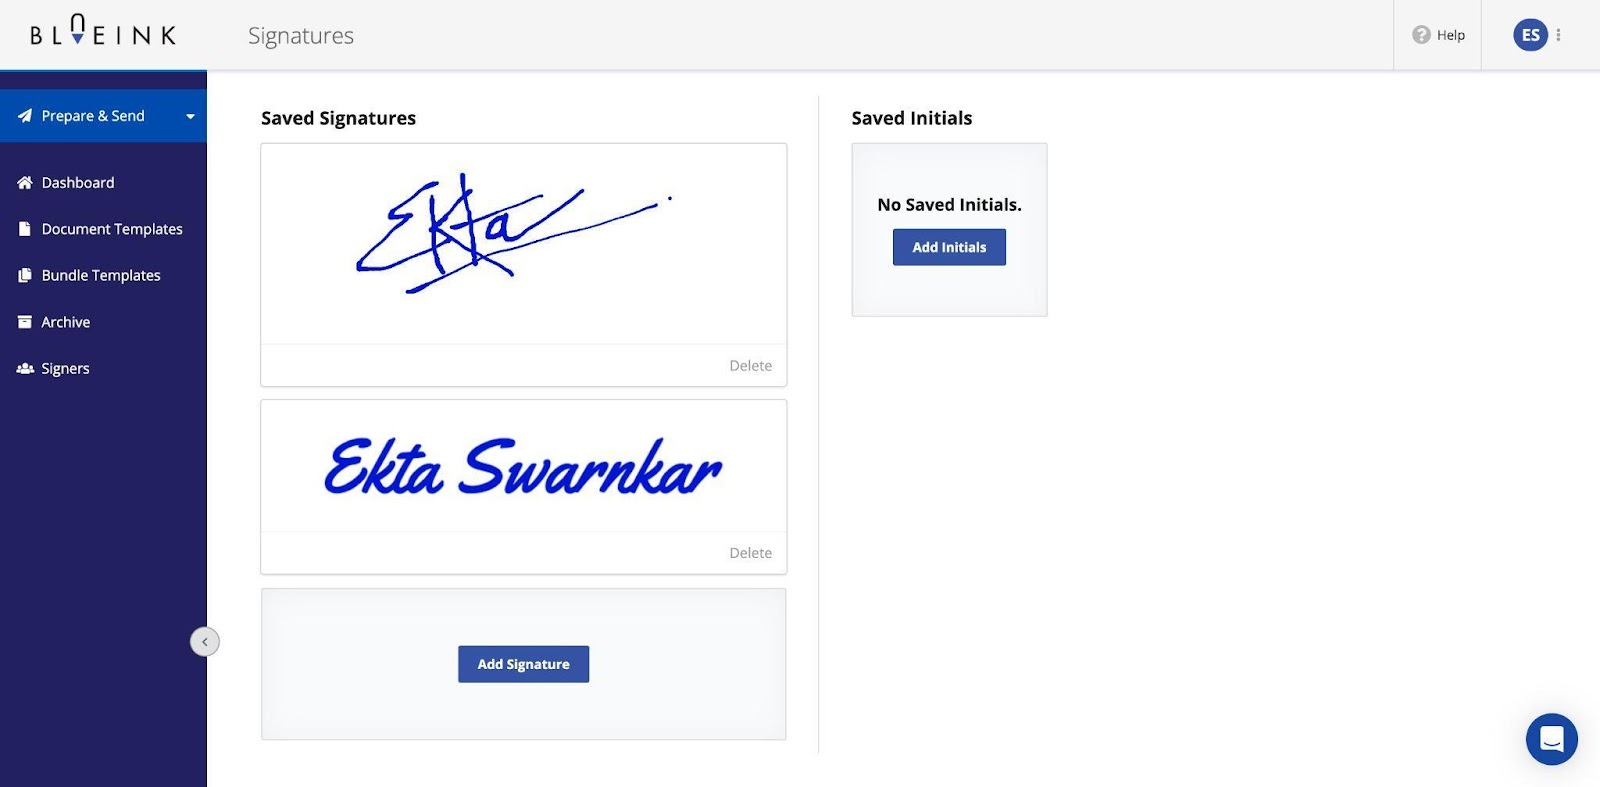
Customizing your e-signature style
Other than creating signatures, BlueInk also provides you with the flexibility to customize your e-signature style to match your preferences or branding.
When creating a signature, click on the “Change Style” option to change the font of your signature.

Now, choose the font you prefer the most and save the signature.
How to create your signature initials using Blueink?
Similar to full e-signatures, initials play a significant role in document signing, especially in legal documents. They are a concise representation of your identity within a document. Using Blueink, you can also design and save your initials:
Navigate to “Settings” on your BlueInk Dashboard
From your dashboard, navigate to the “Signatures” tab and choose “Add Initials.”
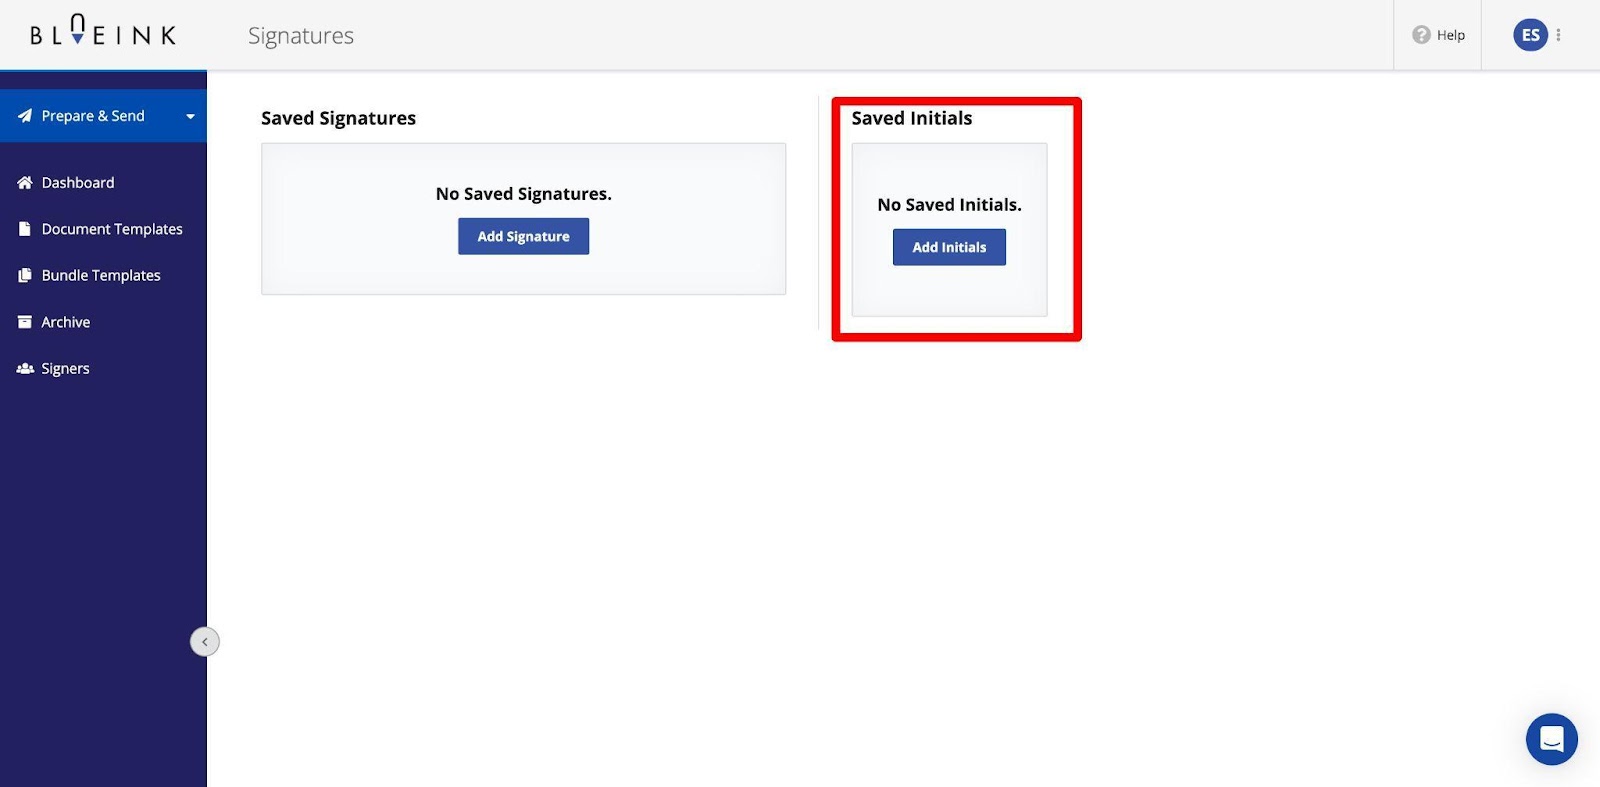
Again, you’ll be asked to either type your initials or draw them. Let’s first see how to type your initials.
Option 1: Typing your initials
Typing your initials can be a quick and efficient way to add your mark to a document. Choose “Type” and type your initials on the space.
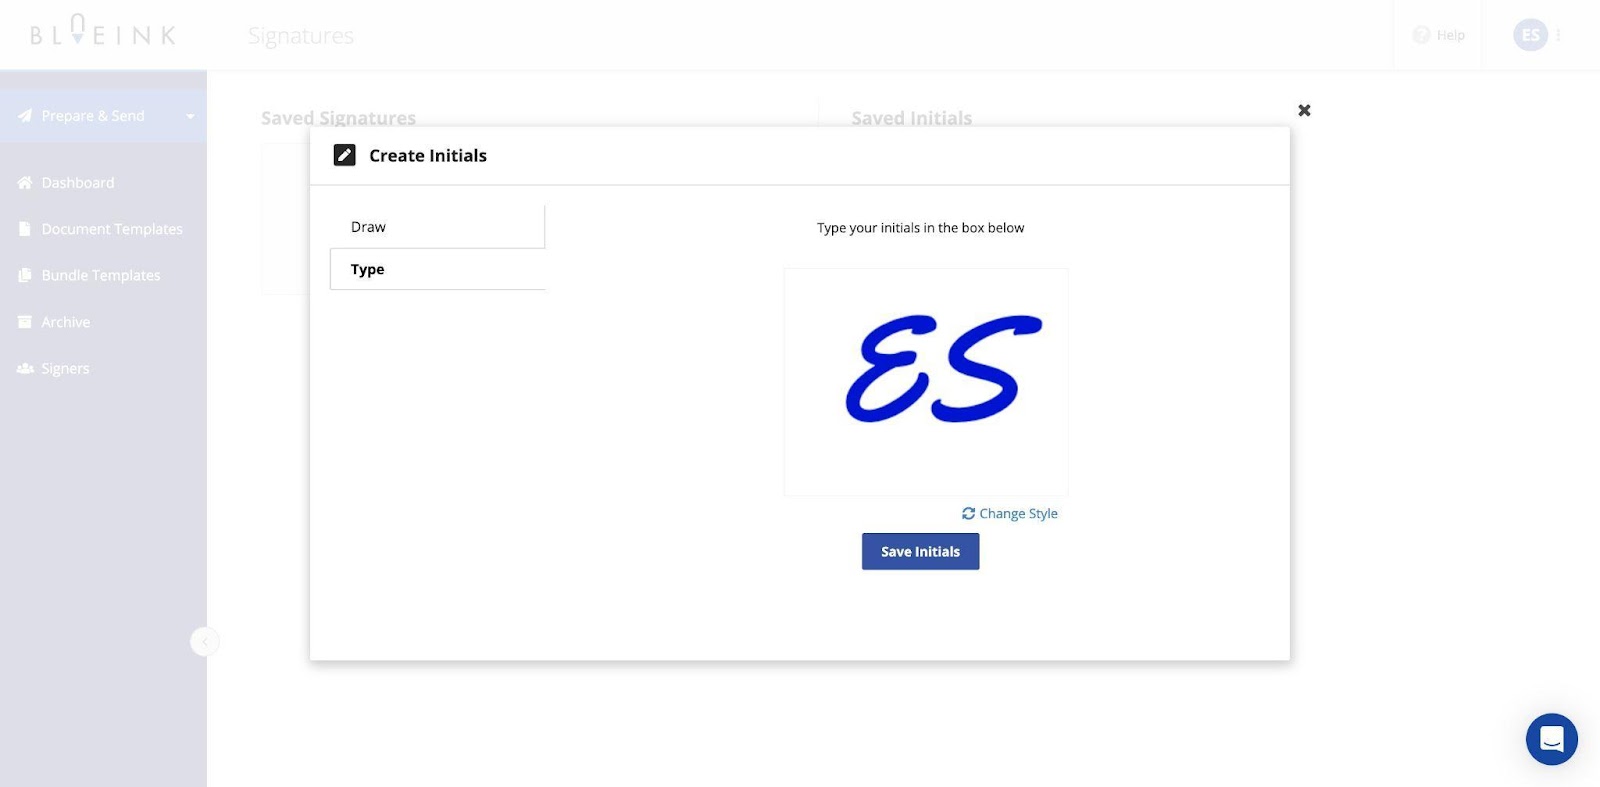
Once done, click “Save Initials,” and it’ll appear in your “Saved initials” section.
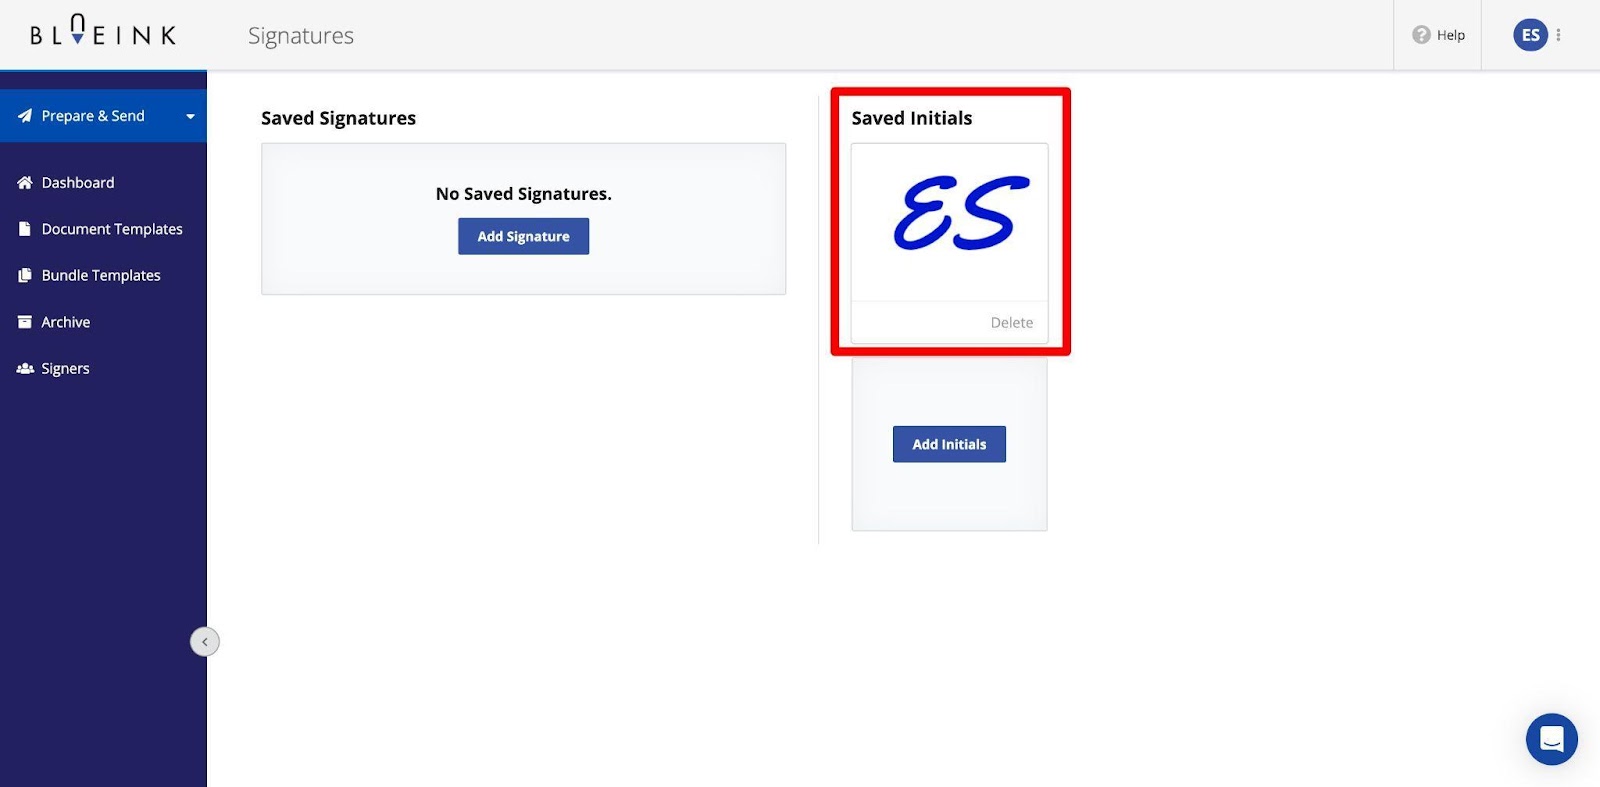
Option 2: Drawing your initials
If you prefer a more personalized approach, drawing your initials is a great option. Choose the “Draw” option on your dashboard and use your touchpad or mouse to draw your initials.
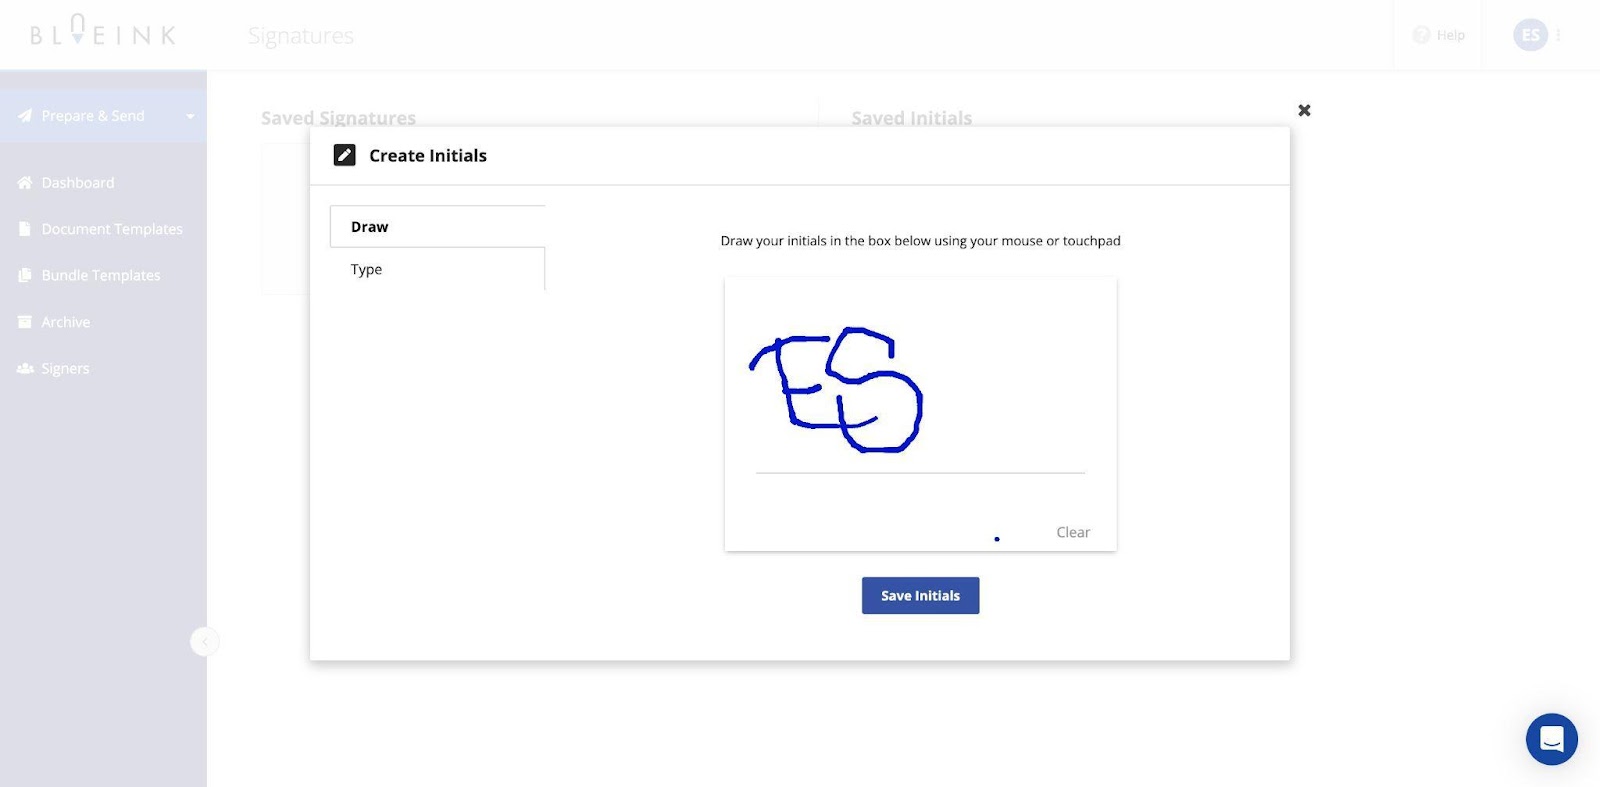
Once you click “Save initials,” it’ll appear in the “Saved initials” section.
Customizing your initials style
Customizing the style of your initials allows you to make them distinct and recognizable. So, if you want to customize your initials, you can follow the same process as we did while customizing the signature.
How to get the most out of Blueink?
BlueInk offers fantastic features to protect and store your documents. These features help you increase the validity of your signatures, so it's essential to follow best practices to ensure a seamless and professional experience.
Whether you are a business owner, manager, or freelancer, these tips will help you make the most of this powerful digital tool:
- Familiarize yourself with legal requirements: Understand the legal validity of e-signatures in your jurisdiction to ensure your documents comply.
- Choose the right font and style: When typing your e-signature, select a font and style that matches your professional image.
- Keep it legible: Whether typing or drawing your e-signature and initials, prioritize legibility to prevent misunderstandings.
- Test your e-signature: Before using your e-signature on essential documents, practice a few times to perfect your style.
- Protect your account: Ensure the security of your BlueInk account with strong passwords and two-factor authentication.
- Save your signature for future use: Always save your e-signature and initials within BlueInk to access future documents easily.
- Audit trail: Review BlueInk's audit trail to keep a record of all document-related activities, including e-signatures.
- Secure your device: Keep your device secure with the latest software updates and security features to protect your e-signatures.
- Check for updates: Stay up-to-date with BlueInk's features and updates to take advantage of the latest enhancements and improvements.
Conclusion
In the digital age, knowing how to create an e-signature and initials is essential for streamlining your document signing process. BlueInk provides user-friendly options, whether you prefer to type or draw your e-signature and initials. Customizing your style ensures that your digital signatures maintain a professional and personalized touch.
As a business owner, manager, or freelancer, the convenience of e-signatures and initials on the BlueInk platform will undoubtedly enhance your document signing experience. Explore the customization options to create a signature and initials that reflect your unique identity while maintaining legal validity.
By following this step-by-step guide, you'll be well-equipped to handle your document signing needs efficiently and professionally. Start your 14-day free Blueink trial today and experience the benefits of digital signatures and initials in your business endeavors.

Weekly Newsletter
Get the latest updates, tips, and exclusive offers. Sign up for our weekly newsletter and stay informed!
Recent post
March 17, 2025
February 5, 2025
Blueink is one of the most accessible, most affordable, and secure e-signature platforms to help you sign and store documents digitally with ease. In this post, we'll guide you through creating e-signatures and initials using the BlueInk hub.
Whether you're a business owner, manager, or freelancer, you'll find this step-by-step guide valuable for streamlining your document signing process.
Using Blueink, you can create e-signatures as well as initials. We’ll show you how to create both types. Let’s start with e-signatures.
How to create an e-signature using Blueink?
But before we tell you how to create e-signatures, let's briefly discuss what e-signatures are and why they are essential.
E-signatures are electronic representations of your handwritten signature, and they have gained widespread acceptance in the digital world. They are legally valid in most jurisdictions, making them a convenient and secure way to sign documents—so if you’re worried about whether your e-signed documents will be valid or not, don’t.
Login to your BlueInk Dashboard
The first step in creating your BlueInk account. Start your 14-day free trial and set up your account. Your dashboard will look like this.

Now, click on the “Settings” and choose “Signatures.”

Now choose “Add Signature.”

You’ll be asked to type your signature or draw it. Let’s first see how to type an e-signature.
Option 1: Typing your e-signature
Choose “Type” and start writing your signature.

Once done, click on “Save Signature.”

And it’s done. Your signature will appear in “Saved Signatures.”

Now, whenever you sign a new document, your saved signature will automatically populate, and you won’t have to go through the process every time.
Option 2: Drawing your e-signature
If you prefer a more personalized touch for your e-signature, BlueInk allows you to draw it by hand. On the “Signatures” tab, choose “Add Signature” and “Draw.”

Now, using your touchpad or mobile, draw your signature. You can use the “Clear” option to redraw the sign.

Once satisfied with your signature, click “Save Signature,” it’ll appear as a saved signature.

Customizing your e-signature style
Other than creating signatures, BlueInk also provides you with the flexibility to customize your e-signature style to match your preferences or branding.
When creating a signature, click on the “Change Style” option to change the font of your signature.

Now, choose the font you prefer the most and save the signature.
How to create your signature initials using Blueink?
Similar to full e-signatures, initials play a significant role in document signing, especially in legal documents. They are a concise representation of your identity within a document. Using Blueink, you can also design and save your initials:
Navigate to “Settings” on your BlueInk Dashboard
From your dashboard, navigate to the “Signatures” tab and choose “Add Initials.”

Again, you’ll be asked to either type your initials or draw them. Let’s first see how to type your initials.
Option 1: Typing your initials
Typing your initials can be a quick and efficient way to add your mark to a document. Choose “Type” and type your initials on the space.

Once done, click “Save Initials,” and it’ll appear in your “Saved initials” section.

Option 2: Drawing your initials
If you prefer a more personalized approach, drawing your initials is a great option. Choose the “Draw” option on your dashboard and use your touchpad or mouse to draw your initials.

Once you click “Save initials,” it’ll appear in the “Saved initials” section.
Customizing your initials style
Customizing the style of your initials allows you to make them distinct and recognizable. So, if you want to customize your initials, you can follow the same process as we did while customizing the signature.
How to get the most out of Blueink?
BlueInk offers fantastic features to protect and store your documents. These features help you increase the validity of your signatures, so it's essential to follow best practices to ensure a seamless and professional experience.
Whether you are a business owner, manager, or freelancer, these tips will help you make the most of this powerful digital tool:
- Familiarize yourself with legal requirements: Understand the legal validity of e-signatures in your jurisdiction to ensure your documents comply.
- Choose the right font and style: When typing your e-signature, select a font and style that matches your professional image.
- Keep it legible: Whether typing or drawing your e-signature and initials, prioritize legibility to prevent misunderstandings.
- Test your e-signature: Before using your e-signature on essential documents, practice a few times to perfect your style.
- Protect your account: Ensure the security of your BlueInk account with strong passwords and two-factor authentication.
- Save your signature for future use: Always save your e-signature and initials within BlueInk to access future documents easily.
- Audit trail: Review BlueInk's audit trail to keep a record of all document-related activities, including e-signatures.
- Secure your device: Keep your device secure with the latest software updates and security features to protect your e-signatures.
- Check for updates: Stay up-to-date with BlueInk's features and updates to take advantage of the latest enhancements and improvements.
Conclusion
In the digital age, knowing how to create an e-signature and initials is essential for streamlining your document signing process. BlueInk provides user-friendly options, whether you prefer to type or draw your e-signature and initials. Customizing your style ensures that your digital signatures maintain a professional and personalized touch.
As a business owner, manager, or freelancer, the convenience of e-signatures and initials on the BlueInk platform will undoubtedly enhance your document signing experience. Explore the customization options to create a signature and initials that reflect your unique identity while maintaining legal validity.
By following this step-by-step guide, you'll be well-equipped to handle your document signing needs efficiently and professionally. Start your 14-day free Blueink trial today and experience the benefits of digital signatures and initials in your business endeavors.
